First Things First!
Firstly, I need to vent. This is a really hard problem to explain to others much less figure out on your own. From a computing point of view there are 4 different disconnected processes running on 4 different systems across a network. Second, I’m tired of reading short novels about the specifications and the different flows and the purposes behind the flows, etc. So, much of the problem is getting all the processes to work together once! Just once!
The Problem
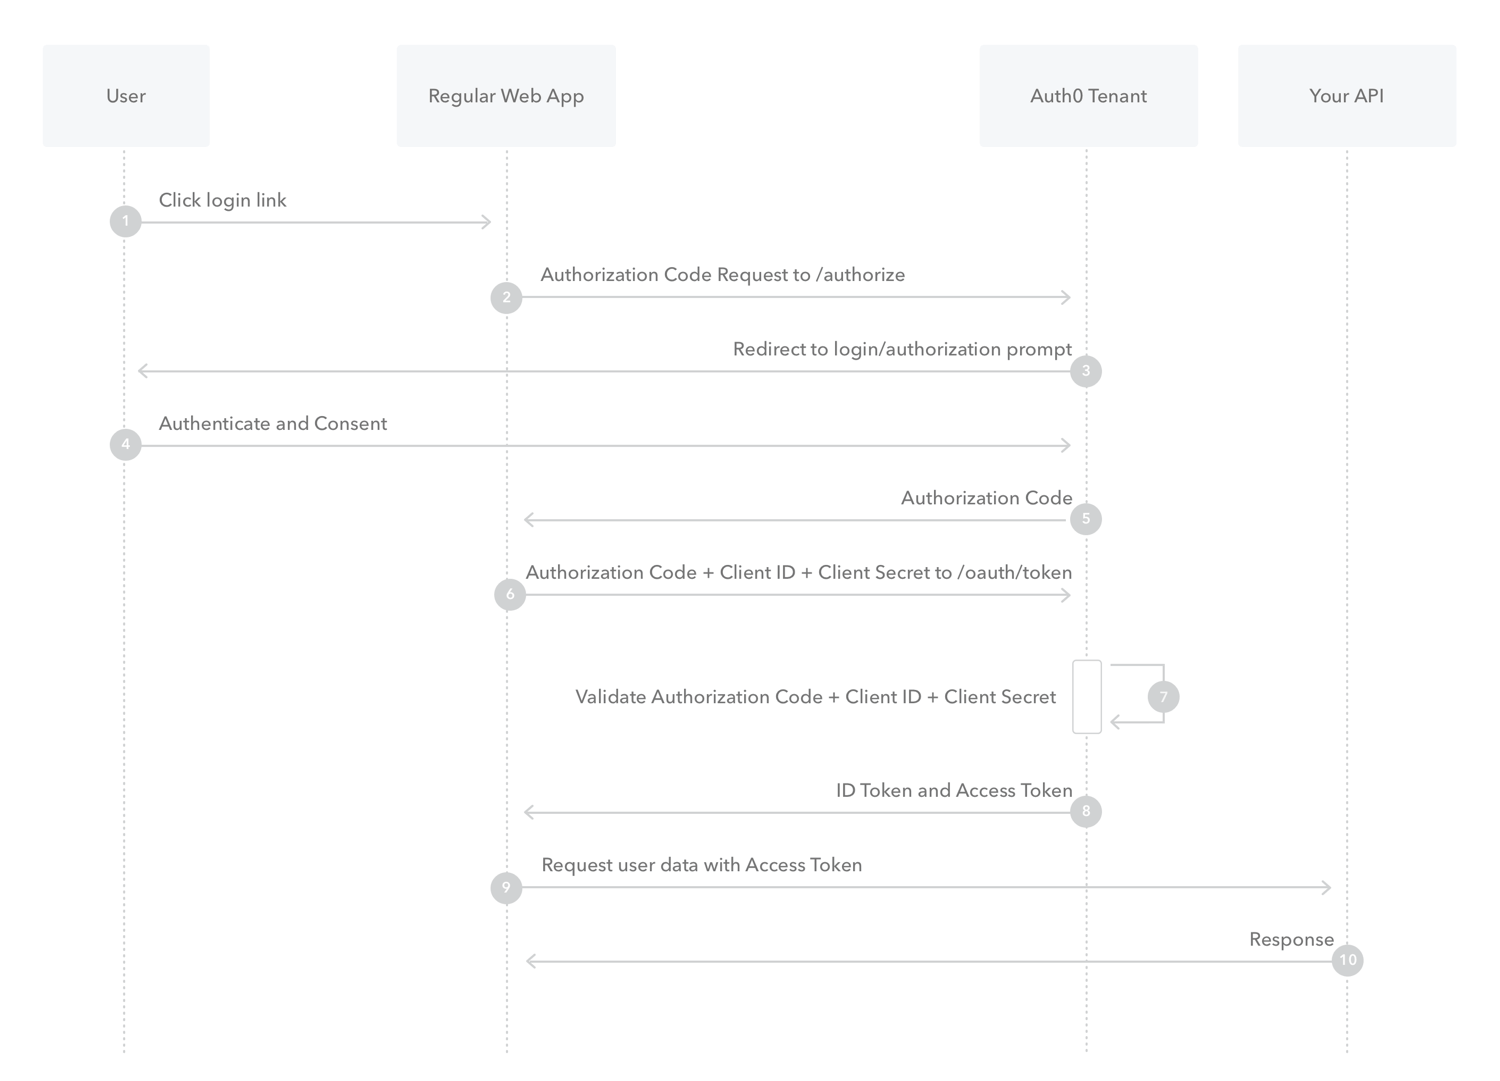
I’m going to focus the problem to get it to work once. That’s it, just once. There’s lots of good sequence diagrams out there describing the steps each actor plays in the process. The one I’m going to use is from here. I’m going to implement it using some off the shelf open source software. This provides the most transparent way of showing how to make the damn broswer behave correctly.
The Parts
The User actor in our case is actually the browser running on a
desktop executing a standard webstack application served from the
Regular Web App. So, in the URL of the browser you will see the
location of the web app. This will be different from the
Auth0 Tenant and Your API locations.
The Browser
I’m just going to use Chrome for this, but I’ll test with Firefox as well.
The Regular Web App
For complicated stack like this, I’m going to use the swagger-ui container. It behaves just like a standard web application and has the development user experience to test the API and OAuth2 sequence.
This container could be easily swapped out for a custom ReactJS application or anything else really, as long as the Javascript is the thing contacting API. You can replace Swagger with a framework that has a backend. In this case, the flow is still correct you’ll just need to balance keeping the tokens negotiated with the OAuth2 Tenant application and user account management in the framework. This setup is not covered by this example, trying to keep things focussed to get it working first.
The OAuth2 Tenant
This is going to be a Keycloak instance as it is an enterprise ready OAuth service and pretty easy to automate the configuration. The automation will be done using Ansible (what else?).
The API
For this I’m going to use a CherryPy application as I know the framework. There’s a couple of advantages in this specific example as well. The framework has a smaller ecosystem than other more popular frameworks like Django or Flask. As a result, I’ll have to implement all aspects of the flow. CherryPy is really good at being a Python web server framework, meaning it’s not going to help me solve this just by importing an additional module.
Where is all this stuff?
I’ve got a repository on GitHub for all my stuff.
Big Points of Order
- localhost or 127.0.0.1 DOES NOT WORK!
- HTTPS is a thing!
- OPTIONS methods are NOT HANDLED ANYWHERE RIGHT!
Faking DNS using Localhost anyway
The docker compose configuration in the repository has a proxy container that listens on the hosts port 80 and 443. This allows the services to be “hosted” on different domains by setting up your local hosts file with the following.
Hosts file entries:
127.0.0.1 keycloak.localdomain swaggerui.localdomain cherrypyapp.localdomain
Then you can open your browser and go to the following addresses:
SSL Certificates are a Thing!
The docker compose configuration also has a container that manages an OpenSSL local certificate authority, intermediate certificate, server and client certificates. The certificates are created by Ansible using a role I developed for another project. The certificates are then transferred to volumes mounted in the right places for the other containers.
Once all the containers are started you can access the public certificate here. Import that file to your trusted root CA certificates on your system. There are known ways of doing this for all platforms. Now when you visit the sites from the previous section they’ll be secure.
OPTIONS Method isn’t implemented right anywhere!
I had to implement an override of the default Keycloak behavior. Any
call to ^/auth/.*/auth$ gets a bunch of extra
Access-Control-Allow-* headers that don’t seem to be returned from
Keycloak no matter how I configured it.
Access-Control-Allow-Origin: "*"
Access-Control-Allow-Methods: "GET, POST, OPTIONS"
Access-Control-Allow-Headers: "Authorization,DNT,X-CustomHeader,Keep-Alive,User-Agent,X-Requested-With,If-Modified-Since,Cache-Control,Content-Type"
Access-Control-Expose-Headers: "Access-Control-Allow-Methods"
After these headers the browser preflight checks (OPTIONS method)
must always return a 20x status code. This will inform the browser
that calling the Keycloak API is okay. These headers are present on
all the services on the three containers.
Finally! CORS is Not The Problem!
After all the above got implemented the CORS issues from the browser went away. Swagger UI was able to authenticate using the OAuth2 client ID and secret. Those two values can be pulled from the output of the CherryPy application. Swagger UI was able to get a bearer token and that token is valid when using it against the CherryPy API.
The final challenge is to perform a complete end-to-end OAuth2 set of tests using Swagger UI to test the API. The CherryPy application leverages Python Social Auth to perform the heavy lifting. However, it still doesn’t work. The CherryPy application goes back and forth with Keycloak independently from Swagger UI just fine. The API still doesn’t work…
The Final Battle!
The way Swagger UI interacts with the two services results in a bearer token. That bearer token is used to try authenticate against the CherryPy application. This is not what CherryPy and PSA want, and I can’t seem to find the right incantation of PSA code to just use the bearer token. The bearer token can be used to get the userinfo from Keycloak. That userinfo contains all the right information to build a user and save it locally. However, this effort seems more like a Python coding effort not an OAuth2 and configuration management issue.